
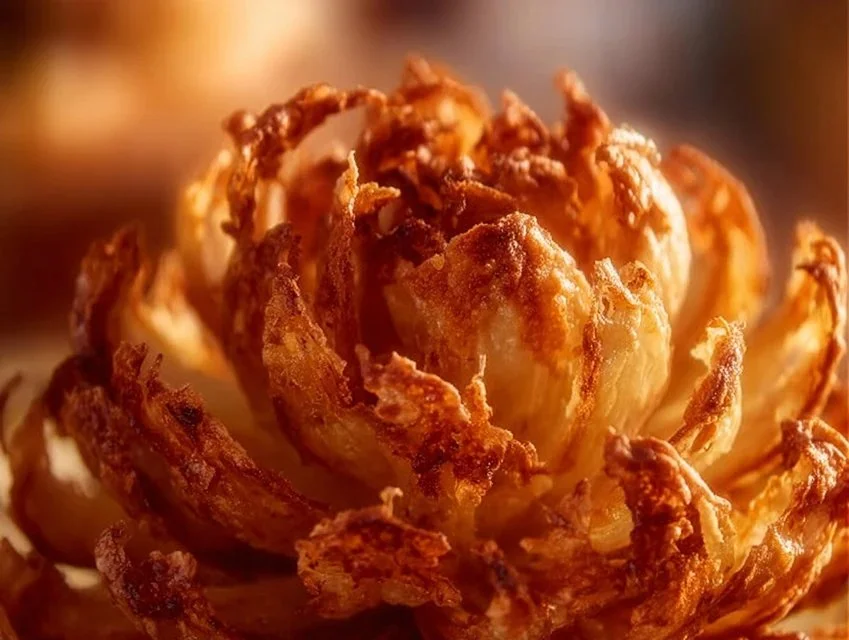
Are you ready to embark on a crunchy, flavorful journey? The Crispy Air Fryer Blooming Onion is a delightful appetizer or snack that never fails to impress. This dish transforms a simple onion into a masterpiece that’s perfect for gatherings, special occasions, or a cozy night in. Its golden petals, crisp texture, and zesty seasonings offer a unique twist on traditional onion rings, making it a winner for any onion lover!
Why You’ll Love This Dish
What sets this Crispy Air Fryer Blooming Onion apart? For starters, it’s a healthier spin on an indulgent treat, thanks to the air fryer cooking method. You’ll love how easy it is to whip up and how quickly it cooks—perfect for unexpected guests or a spontaneous snack craving. Additionally, it’s budget-friendly, making it a great choice for families or anyone keeping an eye on their grocery bills.
As one happy home cook put it:
“This blooming onion was an absolute hit! The crispy texture and delicious seasoning made it a perfect snack for game night. I can’t wait to make it again!”
Step-by-Step Overview
Creating your own crispy air fryer blooming onion is a straightforward process that anyone can master. You’ll be slicing, coating, and air-frying your way to an impressive dish that presents beautifully and tastes divine. With just a few ingredients and a bit of time, you’ll have a mouthwatering appetizer that’s sure to be a crowd-pleaser.
So, what ingredients do you need to get started?
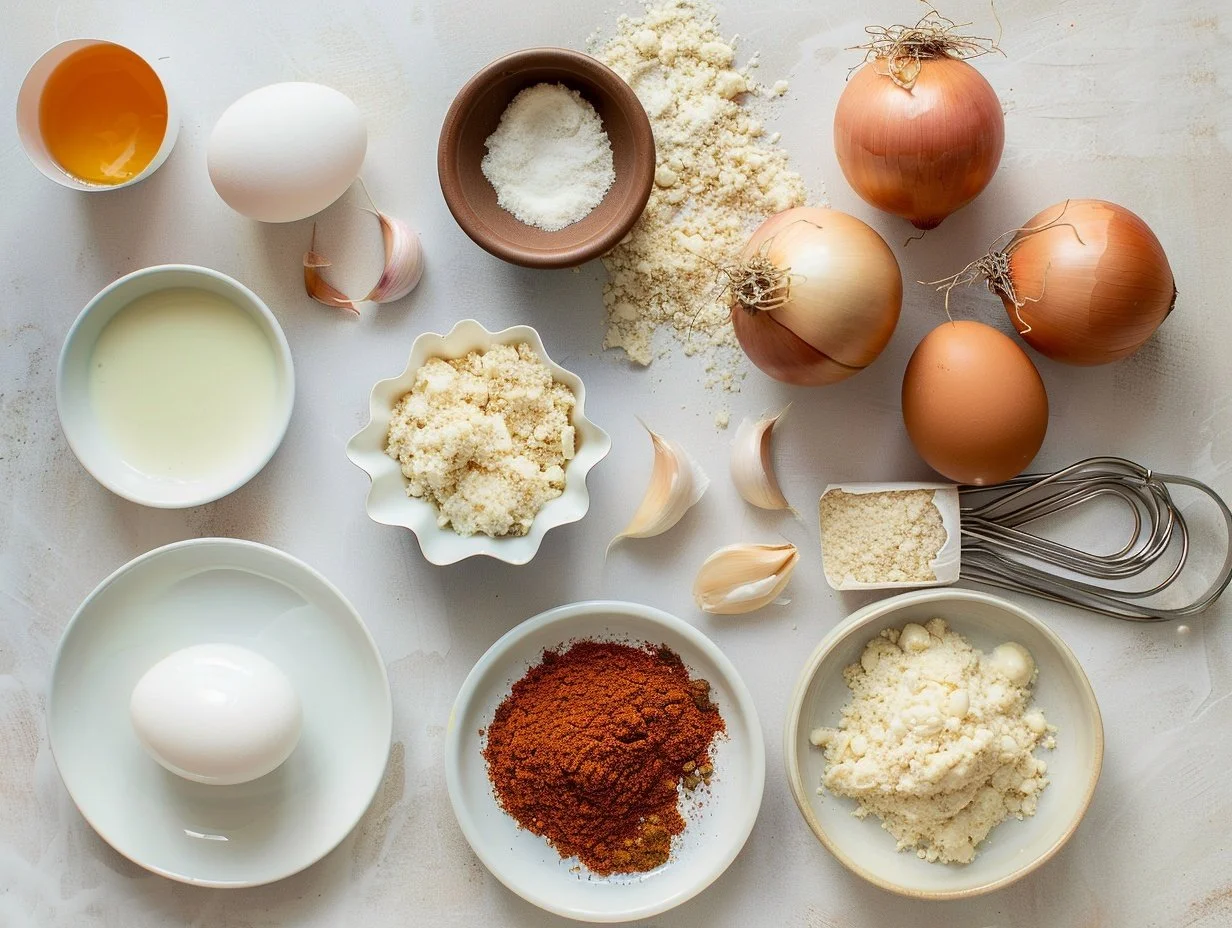
Ingredients
- 1 large onion (preferably a Vidalia)
- 1 cup all-purpose flour (or gluten-free flour)
- 1 cup breadcrumbs (Italian seasoned or panko)
- 1 tablespoon paprika
- 1 teaspoon garlic powder
- 1 teaspoon onion powder
- 1 teaspoon salt
- 1/2 teaspoon black pepper
- 2 large eggs
- 1/2 cup milk
- Cooking spray
Feel free to swap out the breadcrumbs for a gluten-free version or try different spices for added flavor!
Directions to Follow
- Prepare the Onion: Slice the top off the onion. Carefully make 12-16 evenly spaced cuts downwards, being cautious not to cut through the bottom.
- Mix the Dry Ingredients: In a bowl, combine the flour, paprika, garlic powder, onion powder, salt, and black pepper.
- Whisk Wet Ingredients: In another bowl, whisk together the eggs and milk until fully mixed.
- Prepare the Breadcrumbs: Place the breadcrumbs in a separate shallow dish.
- Coat the Onion: First, dip the onion into the flour mixture, ensuring all petals are well coated.
- Egg Bath: Next, immerse the coated onion into the egg mixture, allowing any excess to drip off.
- Breadcrumb Coating: Roll the onion in breadcrumbs until it’s well covered.
- Air Fryer Prep: Spray the air fryer basket with cooking spray and carefully place the onion inside.
- Final Spritz: Give the top of the onion another light spray with cooking spray.
- Cook: Set your air fryer to 350°F (175°C) and cook for 15-20 minutes, turning halfway through, until golden brown and crispy.
- Cool & Serve: Allow it to cool slightly before serving—you want it crisp but not hot enough to scorch your fingers!
Best Ways to Enjoy It
This blooming onion is as versatile as it is delicious. Serve it as an appetizer at your next gathering or as a center plate at a cozy movie night. Pair it with tangy dipping sauces like ranch, spicy aioli, or a zesty ketchup for a fun flavor experience. You might even consider serving it alongside a fresh salad or some crispy fries for a complete meal!
Storage and Reheating Tips
If you’ve got leftovers (though that’s unlikely!), you can store them in an airtight container in the fridge for up to 2 days. To reheat, place them back in the air fryer at 350°F (175°C) for about 5 minutes to regain that delightful crunch. Avoid microwaving, as that could make them soggy.
Pro Chef Tips
- Onion Choice: Vidalia onions are sweet and work beautifully, but don’t hesitate to experiment with other varieties like yellow or sweet onions.
- Crunch Factor: For an even crispier result, try double-coating the onion by repeating the egg and breadcrumb steps.
- Time Management: While your onion cooks, prep any dipping sauces to save time.
Creative Twists
Feel free to customize this recipe by adding your favorite spices or even a sprinkle of cheese in the breadcrumb mix. For a spicy kick, consider adding cayenne pepper or crushed red pepper flakes. You could also experiment with different breadcrumb types, like cornflakes for an entirely different texture!
FAQs
-
What’s the best type of onion to use?
- Vidalia onions are ideal for their sweetness, but any large onion will work.
-
Can I make this recipe gluten-free?
- Absolutely! Use gluten-free flour and breadcrumbs for a delicious alternative.
-
How long does it take to cook?
- It typically takes 15-20 minutes in the air fryer, depending on your model.
-
What dipping sauces go well with it?
- Ranch, aioli, or a spicy dipping sauce all pair wonderfully with the crispy onion.
-
Can I prepare this in advance?
- You can coat the onion in advance and store it in the fridge for a few hours before air frying.
Final Thoughts
Trying out the Crispy Air Fryer Blooming Onion is an adventure in flavor and texture that you won’t regret. It’s simple to make and an absolute delight to eat. We hope you enjoy this crispy masterpiece—feel free to share your experience in the comments below or ask any questions!
Crispy Air Fryer Blooming Onion
Ingredients
Method
- Slice the top off the onion. Carefully make 12-16 evenly spaced cuts downwards, being cautious not to cut through the bottom.
- In a bowl, combine the flour, paprika, garlic powder, onion powder, salt, and black pepper.
- In another bowl, whisk together the eggs and milk until fully mixed.
- Place the breadcrumbs in a separate shallow dish.
- Dip the onion into the flour mixture, ensuring all petals are well coated.
- Immerse the coated onion into the egg mixture, allowing any excess to drip off.
- Roll the onion in breadcrumbs until it is well covered.
- Spray the air fryer basket with cooking spray and carefully place the onion inside.
- Give the top of the onion another light spray with cooking spray.
- Set your air fryer to 350°F (175°C) and cook for 15-20 minutes, turning halfway through, until golden brown and crispy.
- Allow it to cool slightly before serving—you want it crisp but not hot enough to scorch your fingers!