
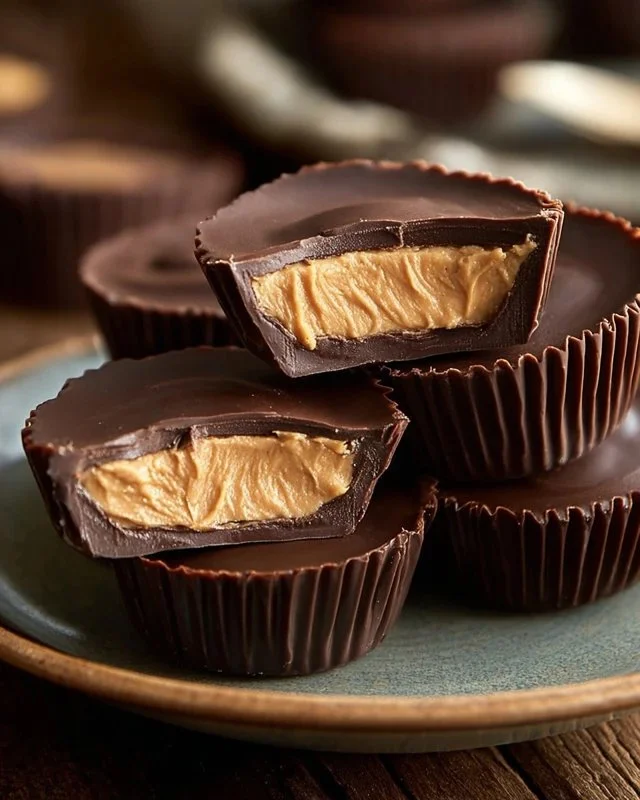
There’s something about the combination of creamy peanut butter and luscious chocolate that always brings back sweet memories. When I first experimented with making a homemade version of peanut butter cups, little did I know that I’d create something better than the classic candy I grew up loving. These treats are perfect for satisfying a sweet tooth, especially when you’re craving something indulgent yet homemade. Imagine whipping these up in your kitchen in less time than it takes to run to the store—these Better Than Reese’s Peanut Butter Cups are an absolute delight.
Why make this recipe
Reasons to try it
You’ll love this recipe for several reasons. First off, it’s surprisingly easy to make—you can whip up a batch in under an hour. Second, it’s an economical treat that uses a handful of basic ingredients you probably already have at home. This makes it perfect for last-minute dessert cravings, potlucks, or a cozy movie night in. Plus, let’s be honest: who wouldn’t prefer a homemade version of candy that’s rich, decadent, and completely customizable?
“These peanut butter cups are a game-changer! I can’t believe how easy they were to make, and they taste better than any store-bought option!” — A happy home baker
How to make Better Than Reese’s Peanut Butter Cups
The cooking process explained
This recipe comes together in three simple stages: mixing the peanut butter base, melting the chocolate, and then assembling the cups. You’ll find that with some straightforward steps, you can create a delicious treat that your friends and family will adore. Grab your ingredients, and let’s make magic happen!
Ingredients
Key Ingredients
To create these delightful treats, gather the following items:
- 1/2 cup peanut butter or any nut butter (almond butter works too) (125g)
- 1 Tbsp softened butter (optional) (15g)
- 1 cup powdered sugar (gradually added) (125g)
- 1 cup milk chocolate candy melts (175g)
- 1 cup dark chocolate (can be a mix of chocolate bars and chips) (175g)
- 1/2 tsp salt (2g)
Feel free to experiment with different nut butters or even sprinkle in some sea salt for an extra touch!
Directions
Step-by-step instructions
- In a medium mixing bowl, combine the peanut butter, softened butter (if using), and salt.
- Gradually add the powdered sugar until the mixture forms a dough with a “playdough” consistency. This means it should be moldable and not sticky.
- Melt your chocolate options using one of two methods:
- Microwave: Heat in bursts of 25 seconds while stirring in between, until fully melted.
- Double boiler: Set a metal bowl over a small pot of simmering water. Place the chocolate inside and stir until melted.
- Line a muffin pan with paper cups. Pour a small amount of melted chocolate into the bottom of each cup.
- Form the peanut butter mixture into discs and place them on top of the melted chocolate.
- Cover with a final layer of melted chocolate until the cups are filled.
- Refrigerate for 20 to 30 minutes until set. Enjoy your delicious creations!
How to serve Better Than Reese’s Peanut Butter Cups
Best ways to enjoy it
These peanut butter cups are best served straight from the fridge, where the chocolate is firm and the filling is creamy. Consider serving them with a glass of cold milk for a nostalgic snack. You can also jazz them up by topping them with crushed nuts, a sprinkle of flaky sea salt, or even a drizzle of caramel for a gourmet touch.
How to store
Keeping leftovers fresh
To keep your peanut butter cups fresh, store them in an airtight container in the fridge. They will last up to a week—if they last that long! If you want to save some for later, you can also freeze them. Just make sure to wrap each cup individually. They can be enjoyed straight from the freezer for a cooling treat!
Tips to make
Helpful cooking tips
- Make sure your peanut butter is well-mixed, as oil separation can make the mixture difficult to handle.
- If you find the dough too crumbly, add a bit more peanut butter until the desired consistency is reached.
- To avoid burning your chocolate, use low power settings in the microwave and stir often.
Variations
Creative twists
If you’re feeling adventurous, try adding different flavors to the filling, like a touch of vanilla extract or a pinch of cinnamon. You could even mix in some mini chocolate chips for added texture. For those with dietary restrictions, swap out conventional chocolate for dairy-free options or use almond flour instead of powdered sugar for a low-carb spin.
FAQs
Common questions
-
How long does it take to make these?
- Prep and assembly take about 20 minutes, plus setting time in the fridge.
-
Can I use natural nut butters?
- Yes, but natural nut butters often have a thinner consistency. Adding an extra tablespoon of powdered sugar may help.
-
What’s the best way to melt chocolate?
- Both the microwave and double boiler methods work well. Just be careful not to overheat the chocolate!
-
How should I store leftovers?
- Keep them in an airtight container in the fridge for up to a week. You can also freeze them for later enjoyment.
-
Can I make these in advance?
- Absolutely! They are great for making ahead of time for parties or gatherings.
Final thoughts
You’re just a few steps away from an indulgent sweet treat that’s easy to make and impossible to resist. I hope you give these Better Than Reese’s Peanut Butter Cups a try. Don’t forget to come back and share your experience in the comments! Enjoy!
Better Than Reese's Peanut Butter Cups
Ingredients
Method
- In a medium mixing bowl, combine the peanut butter, softened butter (if using), and salt.
- Gradually add the powdered sugar until the mixture forms a dough with a 'playdough' consistency.
- Melt your chocolate options using one of two methods: Microwave or Double boiler.
- For microwave: Heat in bursts of 25 seconds while stirring in between, until fully melted.
- For double boiler: Set a metal bowl over a small pot of simmering water. Place the chocolate inside and stir until melted.
- Line a muffin pan with paper cups.
- Pour a small amount of melted chocolate into the bottom of each cup.
- Form the peanut butter mixture into discs and place them on top of the melted chocolate.
- Cover with a final layer of melted chocolate until the cups are filled.
- Refrigerate for 20 to 30 minutes until set.